Excerpted from
The Jeweler’s Saw
by William Vanaria, 2019
and
Modern Metalsmithing
by Megan Auman
Knowing how to use a jeweler’s saw effectively is an important skill for a jeweler. A saw is your most important tool. It’s used for everything from cutting sheet metal to piercing intricate designs.
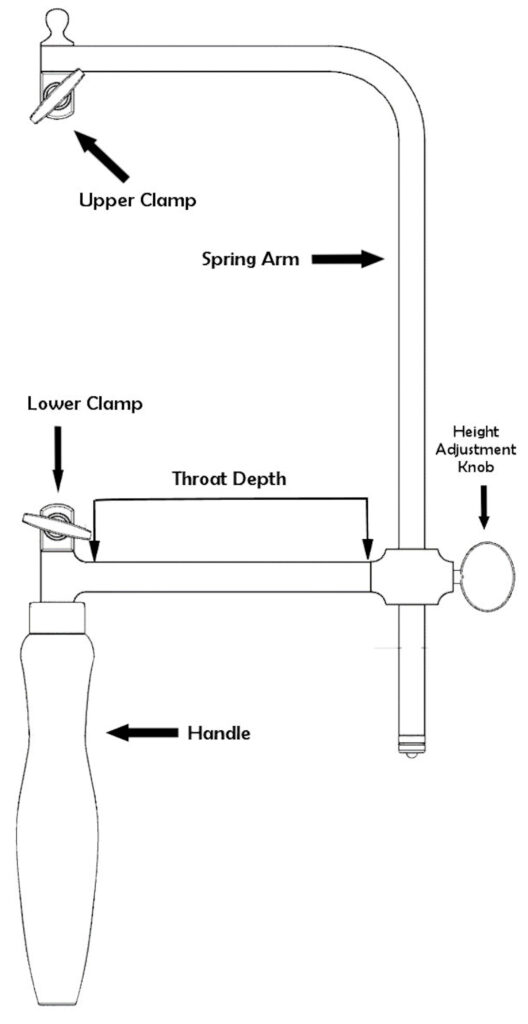
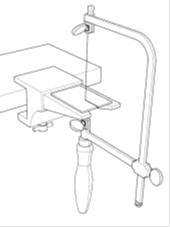
Anatomy of a Jeweler’s Saw
The most common jeweler’s saw is the German pattern saw frame. It has several parts:
- Upper and lower clamps: These hold the saw blade in place.
- Spring arm: This part of the saw tensions the saw blade.
- Throat depth: This can range from 1 inch long to over 8 inches. A saw with a bigger throat cuts wider sheets of metal, but it may wobble as you cut. A saw with a shorter throat is more stable and precise, but it limits the size of metal you can cut. A throat depth of 3-4 inches is a good compromise between these factors.
- Height adjustment knob: Used to adjust the distance of the spring arm between the upper and lower clamps. This places tension on the saw blade.
- Handle: You hold this to operate the saw.
Choosing a Saw Blade Size
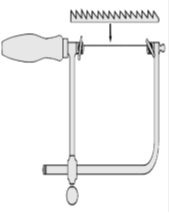
Saw blades for metal look like thin, flat wires with small, sharp, curved teeth.

Blades come in a range of sizes from fine to coarse as shown in the chart below. The finest blade is 8/0 (eight aught) and the coarsest is 8, with 0 near the center of the scale (see diagram below). Coarser blades are numbered: 1, 2, 3, etc. The higher the number, the coarser the blade. Finer blades are numbered 1/0, 2/0, 3/0. The higher the number, the finer the blade (confusing, right?).
A “kerf” is the gap left behind in the material when cut with a saw. A 8/0 blade has the finest teeth and thinnest kerf, while a size 8 blade has the biggest teeth and widest kerf.

The rule of thumb for choosing a saw blade size is that the metal should be three saw teeth thick. Charts suggesting the appropriate saw blade size based on the gauge of sheet metal being cut are widely available. However, you should experiment to find your preferred size.
Loading a German Saw Frame
Step 1. Brace the saw frame against your bench and insert the bottom of the saw blade into the lower clamp. Make sure the blade is facing the correct way (see diagram). The teeth should be pointed away from the spring arm and down towards the handle. The bottom of the saw blade should sit at the bottom of the lower clamp. Tighten the thumb screw to lock it in.
Step 2. The saw blade should sit roughly in the middle of the upper clamp. If it doesn’t, use the height adjustment knob, and adjust the distance of the spring arm between the upper and lower clamps until the blade is in the correct position. Tighten the height adjustment knob when this is achieved.
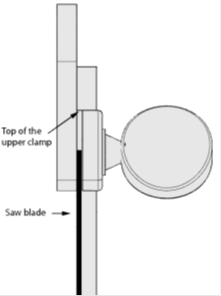
Step 3. Compress the saw frame by pushing it against your bench. You should see the saw blade touch the top of the upper clamp. Tighten the knob on the upper clamp while the saw is still under tension to lock the blade in place.
Why a Saw is Better than Shears for Cutting Sheet Metal
You’ll get a better edge
It’s almost always faster to cut a shape from sheet metal with shears than it is to use a jeweler’s saw. However, shears leave a sharp and jagged edge, which means you spend a lot of time filing to make your project look good. Shears also bend the metal as you cut. A jeweler’s saw keeps sheet metal flat, and leaves a fairly clean edge that requires less filing.
You can cut out more detailed shapes
Shears can cut basic curves, but not much else. With a jeweler’s saw, you are only limited by your imagination and the throat depth of the saw frame. You can cut out small details and tight corners, something which is difficult with shears.
How to Minimize Broken Saw Blades in a German Saw Frame
Check the blade tension
The saw blade must be tight in the frame. Once you’ve loaded the blade in the frame (with teeth facing out and down), flick the blade with your fingernail. A tight saw blade will make a high pitched ping. If you hear a dull sound instead, take the saw blade out and try again. If you can’t get the saw blade tight enough, adjust the length of the spring arm (make it longer) with the height adjustment knob.
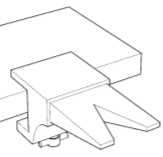
Work at the correct bench or table height
Hold the metal securely so it doesn’t move when you cut it with the saw, otherwise the blade will snap. The most effective way to support your work while cutting is to use a bench pin. A bench pin is a piece of wood with a “V” groove cut into it. The pin is clamped to a bench or table. The bench pin should be mounted at chest height. This keeps your arm in the proper position for maximum sawing efficiency. If you’ve been trying to saw hunched over, this change will make a big difference.
Don’t use a death grip on the saw handle
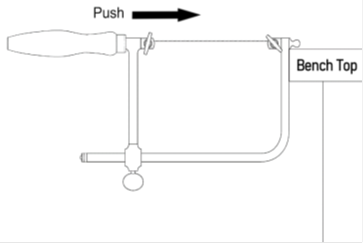
Instead of tightly gripping the handle of your saw frame, try loosening your grip. Pretend the handle is made of glass. You want to hold it firmly so you don’t drop it, but not so tightly that you smash it. Don’t push hard on the blade to force it forward while you’re sawing. Focus on easy, up and down VERTICAL strokes, and let the saw blade do the work.
Turn the metal, not the saw, to change the direction of a cut
If you turn the saw blade instead of the metal to change the direction of the cut, it’s almost certain the blade will break. Turn the metal, not the saw to make a turn. This is hard to learn, but it will get easier with practice!
Lubricate the saw blade
When you saw metal, there is friction between the saw blade and the metal. The friction makes it hard to saw. There are several types of cutting lubricants, including waxes and butters, to reduce the friction. Specialty wax for jeweler’s saws is a common lubricant. Drag your saw blade once through the lubricant (after the blade is loaded in the saw frame) and you’re ready to saw! Reapply the lubricant as needed throughout the sawing process to keep the saw blade moving smoothly through the metal.